
Being Late Taught Me to Plan Every Minute

Introduction: Every Minute Matters in Photography
When I first started taking photography more seriously, I thought being a good photographer was mostly about mastering the technical side. I didn’t realize that having an efficient photography workflow was just as important as knowing my camera, choosing the right lens, finding good lighting, and capturing beautiful moments.
But as I gained more experience, I learned that photography is not only about what happens behind the camera. Building effective photography workflow tips and systems became just as important as improving my technical skills.
One mistake that taught me this lesson happened during a client photoshoot in Jumeirah, Dubai. It was an outdoor shoot scheduled at 5:30 PM in a JLT Park, Gate 1 during the summer season. I thought we had planned enough time to arrive and prepare, but I underestimated one important factor: everything that happens before the actual shoot begins.
The travel time, finding the location, walking with heavy equipment, and preparing under the Dubai heat took more time than expected. By the time we reached the shooting area, we were feeling the pressure of starting late.
That experience changed the way I approach every photoshoot today.
I realized that arriving early is not just about avoiding being late. It gives us time to breathe, prepare our equipment, understand the location, and create a better experience for our clients.
Photography is about capturing important moments, but creating those moments requires a professional workflow behind the scenes. And sometimes, the smallest mistakes teach us the biggest lessons.
1. The Mistake: Arriving Late for a Client Photoshoot
What Happened?
It happened on June 3, during the summer season here in Dubai. The client booked us for an outdoor pre-birthday photoshoot at a park scheduled at 5:30 PM. Since it was an afternoon shoot, I thought we had enough time to travel, arrive at the location, and prepare our equipment before starting.
But I made one mistake. I underestimated how much time we actually needed.
When planning the schedule, I only considered the travel time going to the location. I didn’t fully account for everything else involved in a photoshoot: finding parking, carrying camera gear, walking to the exact shooting spot, checking the location, and setting up before the client arrived.
I was with my photography buddy, Paul, that day, and as soon as we reached the area, we immediately felt the challenge of shooting during Dubai summer. The heat was intense, and even the walk from where we parked to the actual location was already exhausting. We were carrying our equipment, walking under the hot weather, and by the time we reached the spot, we were already sweating before the photoshoot even started.
At that moment, I realized that we had already lost valuable preparation time.
Instead of arriving calmly, checking the environment, and preparing our gear, we started the shoot with pressure. My mind was already thinking about the time we lost and how quickly we needed to begin.
That was the moment I understood something important: being on time is not just about arriving before the client. It is about giving yourself enough space to prepare, focus, and deliver your best work.
2. Why It Happened: Poor Time Calculation
What Caused the Delay?
Looking back, the biggest mistake was not the distance of the location or the traffic. The real problem was how I calculated the time needed for the photoshoot.
I planned the schedule based only on the travel time from our starting point to the location. In my mind, if the drive would only take a certain amount of time, we should arrive with enough time to prepare.
But I forgot that a photoshoot does not begin the moment we arrive at the location.
As photographers, there are many small steps that happen before we capture the first image. We need time to find parking, unload our equipment, walk to the exact shooting area, check the surroundings, prepare our cameras, test our settings, and make sure everything is ready before the client arrives.
I also underestimated the challenge of carrying photography equipment during Dubai’s summer heat. Walking with a camera bag, lenses, and other gear under the hot weather takes more energy and time than expected.
This was the part I overlooked. I was thinking like someone who was simply traveling to a location, not like a photographer preparing for a professional shoot.
A photoshoot is not just the moment when the camera starts recording or when the shutter button is pressed. The work begins before that. The preparation, planning, and time management behind the scenes are what allow photographers to create better results.
This experience showed me that having the right photography workflow tips is not only about organizing equipment. It is about creating a reliable process that helps photographers manage time, reduce stress, and deliver better results.
3. What It Cost: The Impact of Being Late
How Did This Affect You and the Shoot?
Being late did not only affect our schedule, it affected the entire experience of the photoshoot.
The biggest thing we lost was preparation time. We like to arrive early so we can observe the location, check the lighting conditions, prepare camera settings, and think about how we want to capture the story of the day. But because we arrived with limited time, we had to move quickly and start shooting almost immediately.
There was less time to explore the location and find the best angles. Instead of calmly planning each shot, we had to make decisions faster because we knew the clock was already moving.
The summer heat also added another challenge. By the time we reached the location, we were already tired and sweating from carrying our equipment. Starting a creative task while feeling physically exhausted makes it harder to bring the same level of energy and focus that we normally want to give to our clients.
As photographers, our responsibility is not only to capture images. We are also creating an experience for our clients. They trust us to be prepared, confident, and ready to capture their important moments.
This experience taught me that poor time management does not only affect the photographer. It can also affect the client’s experience. When we arrive prepared and relaxed, we create a better environment where everyone feels comfortable and confident.
Looking back, I believe we could have delivered an even better experience if we had given ourselves more time before the shoot. The photos may still have been captured, but the process would have been smoother, less stressful, and more enjoyable for everyone involved.
4. What I Learned: Preparation Is Part of the Photography Workflow
The Lesson Behind the Mistake
This experience completely changed the way I think about photography and the importance of following effective photography workflow tips before every client session.
Before this photoshoot, I believed preparation meant charging batteries, formatting memory cards, and making sure my camera bag was ready. While those things are important, I realized that being prepared goes far beyond having the right equipment.
Professional photography starts long before the photoshoot begins.
It starts with planning your route, checking the weather, researching the location, estimating how long it takes to walk from the parking area, and allowing enough buffer time for unexpected delays. These small details may not seem important at first, but together they can determine whether you begin a shoot feeling calm and confident or rushed and stressed.
I also learned that creativity thrives when you’re not racing against the clock. When I arrive early, I have time to explore the location, study the available light, think through my compositions, and mentally prepare for the story I want to capture. Instead of reacting to the situation, I can approach the shoot with intention.
More importantly, I realized that clients notice more than the final photos. They notice how organized you are, how confidently you work, and whether you make them feel that they’re in good hands. A smooth and well-prepared experience builds trust just as much as a beautiful gallery does.
If I could go back and speak to myself before that photoshoot, I would say this:
“Don’t plan to arrive on time—plan to be ready on time. The client isn’t paying only for your photos; they’re trusting you to provide a professional experience from the moment you arrive.”
That lesson has stayed with me ever since, and it has become an essential part of my photography workflow.
5. How I Fixed It: My New Photoshoot Preparation Process
The New System You Follow Today
After that experience, I promised myself that I would never let poor planning put me in the same situation again. Instead of simply telling myself to “leave earlier,” I built a preparation system that I now follow before every photoshoot.
One of the biggest changes I made is planning to arrive at least 30 to 60 minutes before the scheduled start time, depending on the location and type of shoot. That extra time isn’t there in case I’m late—it’s there so I can arrive, prepare, and start the session feeling calm rather than rushed.
I also prepare everything I can the night before. My camera batteries are fully charged, memory cards are formatted, lenses are cleaned, and every piece of equipment is packed and ready to go. This helps me avoid last-minute surprises before leaving home.
Before the day of the shoot, I research the location whenever possible. Check the parking, estimate how long the walk will be to the shooting area, and look for anything that could slow us down. On the day itself, I also check traffic conditions before leaving so I can adjust my departure time if needed.
I plan the entire journey from leaving home to standing at the exact spot where I’ll take my first photo.
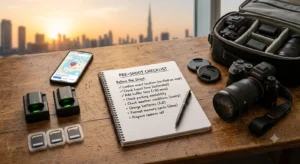
My Current Pre-Shoot Checklist
Before the Shoot:
- Confirm exact location
- Check travel time
- Add buffer time
- Check parking availability
- Check weather conditions
- Charge batteries
- Format memory cards
- Prepare camera set
This system doesn’t guarantee that every photoshoot will go perfectly, but it gives me something much more valuable: confidence. Instead of worrying about what I forgot or whether I’ll make it on time, I can focus on what matters most—capturing meaningful moments for my clients.
Buffer Time Rule
One habit has made the biggest difference in my photography workflow: I always build buffer time into my schedule.
Today, I don’t aim to arrive exactly when the client expects me. Instead, I plan to arrive 30 to 60 minutes before the scheduled start time, depending on the location, travel distance, and complexity of the shoot. If it’s an unfamiliar venue or a large outdoor location, I’ll give myself even more time.
Some people might think arriving that early is unnecessary, but I’ve learned that those extra minutes are never wasted.
Buffer time gives us the opportunity to park without rushing, carry equipment at a comfortable pace, and walk to the shooting location without feeling exhausted. It also allows us to scout the area, observe the lighting, test camera settings, and think through the shots we want to capture before the client arrives.
More importantly, buffer time changes our mindset.
Instead of worrying about traffic, checking the clock every few minutes, or feeling pressured to catch up, arrive feeling relaxed and in control. That confidence helps us communicate better with our clients, think more creatively, and focus on telling their story instead of recovering from a stressful start.
One lesson I’ll never forget is this:
Don’t plan your arrival around the client’s schedule. Plan your arrival around everything that needs to happen before the first shot.
Photography isn’t just about showing up with a camera. It’s about showing up prepared. And sometimes, the best photos begin with something as simple as arriving a little earlier.
6. Advice for Beginner Photographers
What Should Beginners Learn From This?
If you’re just starting your photography journey, here’s one piece of advice I wish someone had given me: don’t underestimate the time it takes to prepare for a photoshoot.
Many beginner photographers think the job starts when they arrive at the location. I used to think the same way. I would calculate the driving time, leave accordingly, and assume everything else would fall into place.
In reality, a professional photoshoot begins long before you press the shutter button.
You’ll need time to find parking, carry your equipment, walk to the location, check the lighting, prepare your camera settings, and greet your client without feeling rushed. These small tasks can easily take 20 to 30 minutes—or even longer if you’re shooting somewhere unfamiliar.
My advice is simple: plan backward from the moment you want to be ready, not from the moment the photoshoot starts. If your session begins at 5:30 PM, ask yourself, “What time do I want to have my camera ready?” Then work backward to determine when you should arrive and when you should leave home.
Here are a few habits that have helped me avoid the same mistake:
- Arrive at least 30–60 minutes early whenever possible.
- Research the location before the shoot, including parking and walking distance.
- Check traffic and weather before leaving.
- Pack and check your gear the night before.
- Build buffer time into every booking for unexpected delays.
Remember, clients don’t just hire you because you own a camera. They hire you because they trust you to provide a professional experience. Being organized, prepared, and calm leaves just as strong an impression as the photos you deliver.
If sharing this mistake saves you from feeling stressed before your first paid shoot, then it’s a lesson worth passing on.
Actionable Tips:
1. Never Arrive Exactly on Time
- Aim to arrive 30–60 minutes early
- Especially for outdoor shoots
2. Consider Everything Before Shooting
- Travel time
- Parking
- Walking distance
- Equipment setup
- Location preparation
3. Create Your Own Photography Workflow
Example:
Day Before
- Charge batteries
- Backup files
- Prepare gear
Before Leaving
- Check equipment
- Check weather
- Confirm location
Before Shooting
- Scout location
- Test settings
- Prepare mentally
7. Final Thoughts: Every Mistake Improves Your Craft
Looking back, I’m actually grateful this mistake happened early in my photography journey.
At the time, arriving late felt frustrating and embarrassing. I kept thinking about what I should have done differently and how much smoother the photoshoot could have been if I had planned better. But that single experience changed the way I prepare for every client session.
I’ve learned that mistakes aren’t failures—they’re opportunities to improve. Every challenge reveals a weakness in your process, and every lesson gives you the chance to build a better system. In my case, that system became a more intentional photography workflow, one that values preparation just as much as creativity.
Photography isn’t only about taking beautiful photos. It’s about earning your client’s trust. When you arrive prepared, organized, and confident, your clients can relax knowing they’re in good hands. That confidence allows you to focus on what you do best: capturing moments that matter.
If there’s one lesson I hope you take away from my experience, it’s this:
The best photographers aren’t the ones who never make mistakes—they’re the ones who learn from every mistake they make.
So don’t be discouraged when something doesn’t go as planned. Reflect on what happened, improve your process, and keep moving forward. Every photoshoot teaches you something new, and every lesson brings you one step closer to becoming the photographer your clients can rely on.
After all, great photography isn’t built on perfect shoots. It’s built on the lessons we carry into the next one.